DIY IKEA Grow Cabinet

A grow cabinet is a small, enclosed space designed for growing plants indoors. These cabinets typically have built-in lighting, ventilation, and hydroponic systems to provide the optimal growing environment for plants.
Grow cabinets are a great option for those who want to grow plants indoors but don't have the space for a traditional garden. They are also useful for those who live in areas with poor outdoor growing conditions, such as extreme temperatures or lack of sunlight.
One of the main benefits of using a grow cabinet is that it allows you to control the environment in which your plants are growing. This means that you can customize the lighting, temperature, humidity, and nutrient levels to suit the specific needs of your plants.
Another advantage of grow cabinets is that they are usually designed to be very efficient, using minimal space and resources. This makes them a great choice for those who want to grow plants but are concerned about the environmental impact of traditional gardening methods.
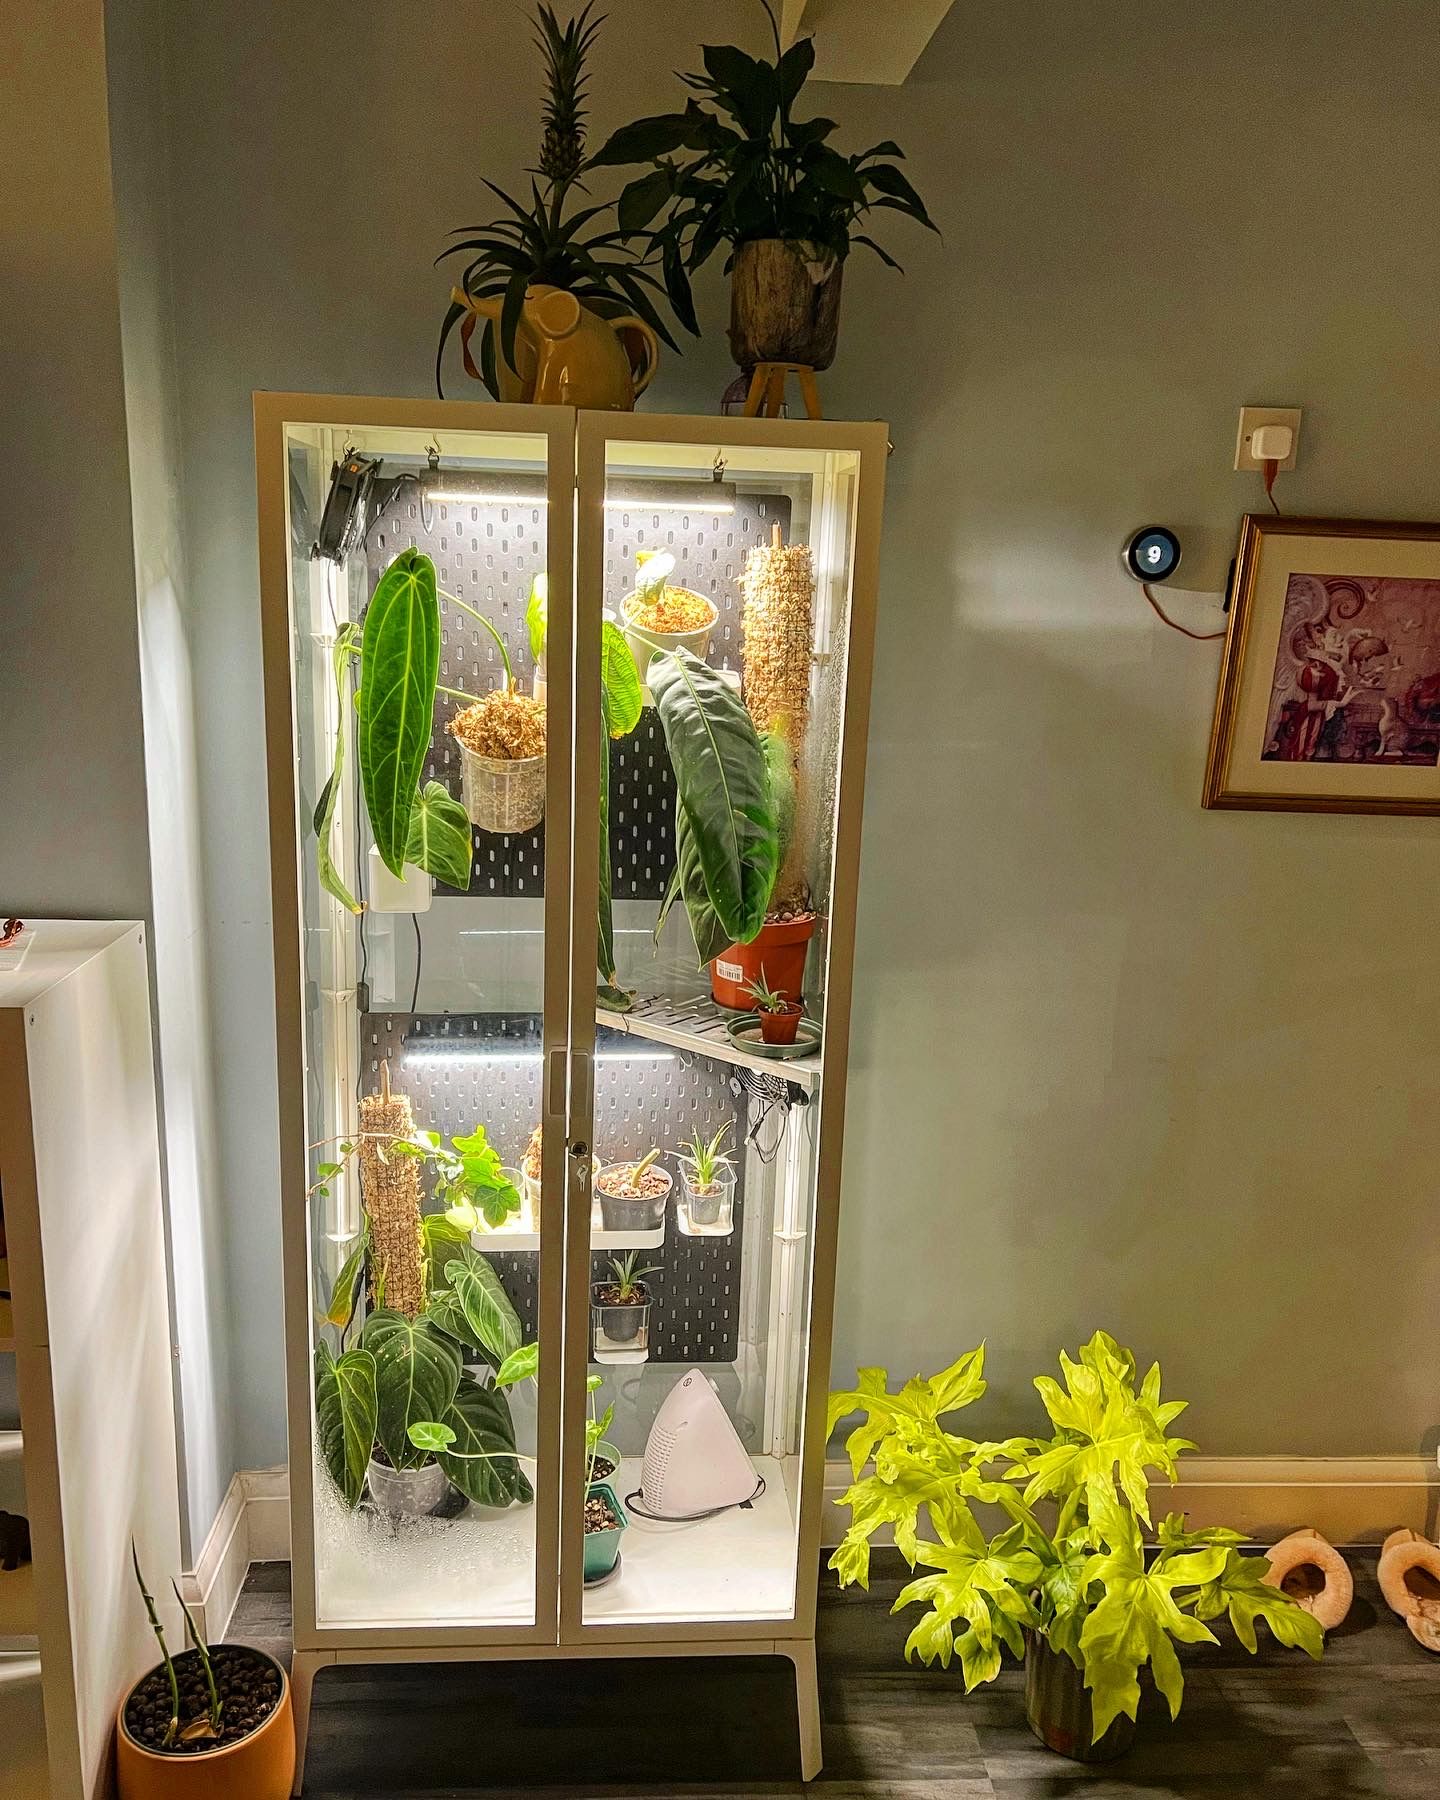
There are many different types of grow cabinets. However, in the post I am going to discuss how one can build your own grow cabinet, for growning tropical plants, using a widely available IKEA Milsbo.
If you're interested in growing plants indoors, a grow cabinet may be a great option for you. With the right setup and care, you can enjoy fresh, healthy plants all year round, regardless of the weather outside.
If you're looking for an affordable and easy way to set up a grow cabinet for your indoor gardening needs, an IKEA Milsbo cabinet is a great option. This sleek, modern cabinet can easily be converted into a highly functional grow box that will allow you to grow a variety of plants indoors, even if you don't have a lot of space. In this post, we'll go over the steps for building your own DIY grow cabinet using an IKEA Milsbo cabinet.
Step 1: Gather materials
To get started, I have used the following materials:
- IKEA Milsbo cabinet
- 2x Mother PlantSpectrum 16 grow lights (or other grow lights of your choice)
- TP link smart Power strip
- Self adhesive weather strip tape (Weather Strip Tape - Ravsool Door Window Draught Excluder Anti-Collision Weather Stripping Self Adhesive, Rubber D Type EPDM Foam Soundproofing Avoida for gaps between the door and, the cabiner and Silicone Seal Door Strip Bottom - 8M/26ft (W: 45MM) Silicone Sealing Sticker Self Adhesive Weather Stripping for Gaps of House, Glass Shower, Window a for the gap between the two doors)
- 2x AC affinity Multifan
- SensorPush HTP.xw Wireless Thermometer/Hygrometer/Barometer and G1 WiFi gateway
- IKEA Milsbo small right corner shelf
- Skådis pegboard and accessories.
- Pro Breeze® Mini Heater - Ceramic Fan Heater perfect for Desks and Tables - Personal PTC Heater, White
- Neosmuk Magnetic Hooks Heavy Duty, 100 lb+ Strong Magnet with Hook for Cruise, Super Strength Industrial Hooks for Hanging, Magnetic Hanger for Fridge
Step 2: Prepare the cabinet
Begin by assembling the IKEA Milsbo cabinet according to the instructions. Drill a hole at the bottom of the cabinet for the power cables and place a cable gromet (this will prevent the metal edges from damaging the cables, and improve weather proofing). Once it's fully assembled, you'll need to add weather stripping to the interior of the cabinet to increase the efficiency of your grow cabinet. This can be done by applying weather stripping to the gaps in the cabinet. Instead of the glass shelves that come with the cabinet, use the corner shelf. This will allow air to flow throughout the cabinet freely (very important).
Follow instructions to install Skådis pegboard and accessories (e.g., shelves, hooks)
Step 3: Install grow lights, fan and the heater
Next, you'll need to install the grow lights and the fans. The top grow light can be hung from the top of the cabinet using the magnetic hooks, the second growlight at the bottom is fixed tothe peg board (not the best solution, but it works for now). The top fan should be attached to the top of the cabinet using a magneting hook, while the second one should be hung from the corner shelf. This will ensure that there will be a continous flow of air throughout the babinet. Place the heater at the bottom (hot air floats upwards).
Step 4: Add thermometer/hygrometer and timer
To ensure that the temperature and humidity levels inside the cabinet are optimal for plant growth, place the SensorPush thermometer/hygrometer sensor inside the cabinet, and setup the gateway using the SensorPush mobile application. It will allow you to monitor the temperature and humidity inside the cabinet and set alerts for various temprature and humidity thresholds.
Step 5: Add plants
Finally, it's time to add your plants. Choose a growing medium (soil or hydroponics) and either start with seeds or seedlings. Once your plants are in place, you can monitor the temperature and humidity levels inside the cabinet.
Connect all devies to the power strip and set specific lighting schedules for your plants.
Congratulations, you have now built your own DIY grow cabinet using an IKEA Milsbo cabinet. With this setup, you'll be able to easily grow a variety of plants indoors, even if you don't have a lot of space. Remember to regularly check the temperature, humidity and light levels, set the right temprature levels on the heater, as well as watering and fertilizing your plants to ensure optimal growth.